The A series from Samsung is popular and Galaxy A20 is a part of the A-series. It is one of the base variants which is available in a budget. Galaxy A20 packed with amazing specs and it is one of the best phones in its range. Although the device performs exceptionally well, you can also improve the performance by rooting your phone. Here we will tell How to Root Samsung Galaxy A20. 
There are two working methods which you can follow to root your Galaxy A20. But both of the method will be using the same App which is Magisk. Magisk is the best tool for rooting an Android phone without breaking the system. The development has started for Galaxy A20 and unofficial TWRP Recovery is already available. It will be easy to root any Android phone if TWRP or a custom Recovery is installed. Check out more about Root before you Root your phone.
What is Root?
Rooting any phone gives access to the Root files of the operating system on which phone is running. It means you will have the full control over all the system files and you can change it accordingly whenever you want. It opens a portal for system-level customization.
Advantages of Root
- Full control over the operating system of your phone
- All the apps that require root access will start working
- Easy tweaks to increase performance manually
- Uninstall unnecessary preinstalled apps (bloatware)
- Easy full backup and restore
- Blocks annoying ads from all the apps (requires Adblocker)
- Better battery life and system performance
Note: Many users think that installing custom ROMs or Recovery requires root access which is not true at all. You just have to unlock bootloader to install custom ROMs & Recoveries on your phone.
Disadvantages of Root
- Following the wrong method could brick your device
- Rooting will void the warranty of the phone
- Rooting a Samsung phone will trip KNOX
- The device will not get any official OTA updates after rooting
How to Root Samsung Galaxy A20
There are many reasons to root an Android phone which you now know after reading its advantages. So if you want to make full use of your phone check out the below guide and root your Galaxy A20. But first, you need to follow the prerequisites and then the step by step guide. We have also included the Galaxy A20 unlock bootloader guide so if you have the phone with locked bootloader then it will help you to unlock the phone.
Prerequisites
- Download Magisk Manager APK
- Download Odin Flash Tool
- Take a full backup (this method will delete data of your phone)
- Download Firmware for your phone (Same version on which your phone is running)
Galaxy A20 Unlock Bootloader
- Open Settings, navigate to About Phone and tap 7 times on Build Number. It will enable developer options in Galaxy A20.
- Open Developer Options, for this you need to go to Settings > Developer Options.
- In Developer Options enable OEM Unlocking.
- Power off your device and then press Volume Up + Volume Down buttons together. While pressing the buttons, connect your phone to PC, it will boot Galaxy A20 into Download Mode.
- Press & hold Volume Up button to unlock the bootloader.
- It will now unlock the bootloader and wipe all the data and your phone will reboot automatically.
- Make sure your phone has an internet connection while setting up the device. You can skip the setup if you want.
- Again open Developer Options and check the OEM Unlocking, it should be enabled and greyed out.
- Now your phone is eligible to root, so follow the procedure below and root your Galaxy A20.
Guide to Root Galaxy A20
- Download the Firmware on PC and Magisk Manager on your phone.
- Extract the downloaded Firmware file and copy the AP file to your phone. Remember the location of the AP file in phone.
- Install the latest Magisk Manager app on your phone.

- In Magisk Manager click on Install > Install > Select and Patch a File.

- Locate and select the AP file that you copied earlier.
- It will now patch the AP file and store the output (magisk_patched.tar) in Download folder.
- Remove the USB cable from PC if connected and then reconnect your phone to PC using the USB Cable. Transfer the magisk_patched file to PC.
- Boot your Phone into Download Mode (follow the steps given in the unlock bootloader section ) and make sure the phone is connected to PC.
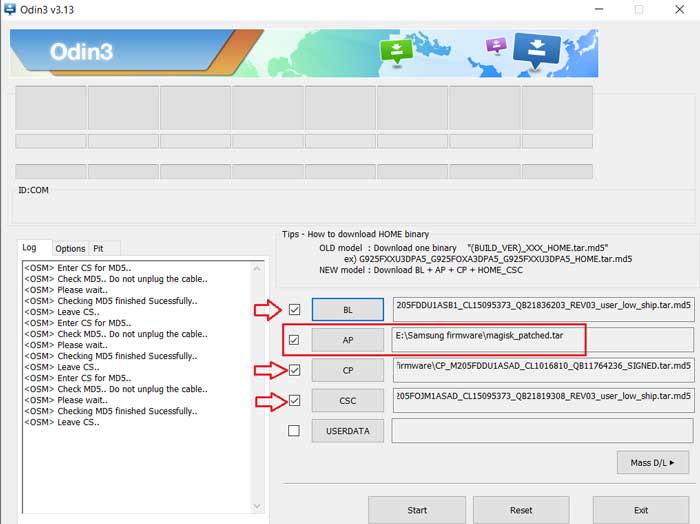
- Open Odin Tool and load the magisk_patched.tar in the AP section. And in BL, CP, Home_CSC load the respective files (these three files will be in extracted firmware folder).

- Now uncheck ‘Auto Reboot’ option in the options tab.

- Then click on the Start button and wait for installation. After installation long press Volume Down + Power button together and when the screen goes off immediately press Volume Up + Power button together to boot the device into Recovery mode.
- In stock recovery, use the volume buttons to navigate, navigate to Wipe data/factory reset and press the Power button to wipe the data.
- Now select the Reboot System Now and immediately press Volume Up + Power button together.
- Release both buttons when you see the Bootloader warning screen. Connect your phone to the internet and complete the setup.
- Open Magisk Manager app (if not available install it again) and complete the additional setup that Magisk Manager will ask. Your device will automatically reboot once.
- That’s it, your Samsung Galaxy A20 is now rooted.


Boot accordingly
- Reboot without Root – Power up normally
- Reboot with Root – OEM Recovery Key Combo → Splash screen → Release all buttons
- Reboot to Recovery Mode – OEM Recovery Key Combo → Splash screen → Keep pressing volume up
So there you have it the complete step by step guide on Galaxy A20 root. If you have any questions or facing any error then comment down below. We will reply with the solution.
Related Articles:
I have tried all twrp installation but it couldnt boot to twrp recovery mode. I am using A20-SCV46