
Recently Samsung has introduced budget-oriented phones such as Galaxy A30s, A50s, A70s, M30s and more. All these smartphones come with great specs to deliver extreme performance. Now in this article, we will talk about Galaxy A50s, and if you have the Galaxy A50s then this guide is for you. Here you will know How to Root Samsung Galaxy A50s.
Rooting the Galaxy A50s will boost the performance as you can play with system settings. You will have access to everything on your phone. Samsung has tightened the security on its phones since the launch Android Pie so it is hard to root Samsung phones. But not too hard that you can’t root your phone. Here in this guide, you will know the way to root Galaxy A50s. As of now, the TWRP Recovery is not available for Galaxy A50s so we are going to use another method to root Galaxy A50s. But before moving to steps here are the specifications of Galaxy A50s that you may want to know.
Samsung Galaxy A50s – Details
Galaxy A50s features a 6.4-inch Super AMOLED Full-HD+ (1080 x 2340 pixels) display. The device runs on Android 9 Pie based on One UI out of the box. One UI is Samsung’s custom UI which comes with more enhancements. Galaxy A50s powered with Exynos 9611 processor with integrated Mali-G72 MP3 GPU. It is coupled with 4GB and 6GB RAM with 64GB & 128GB of internal storage.
Now talking about its camera, the phone has a triple rear camera setup for amazing photos. The triple camera setup includes a 48-megapixel wide sensor, 8-megapixel ultra-wide sensor, and 5-megapixel depth sensor. And at the front, it has a 32-megapixel selfie camera which can record 1080p videos at 30fps.
Other specs include a big 4000mAh battery with Type C port. It supports 15W fast charging to charge the phone in less time. Now let’s move to the steps to root Galaxy A50s. I have separated steps in a different section for convenience.
You May Also Like | Download Google Camera 6.1 for Samsung Galaxy A50s
How to Root Samsung Galaxy A50s
In this guide, we are going to use Magisk to create a patched image. The image will be used further to root Samsung Galaxy A50s. But first, you need to follow prerequisites and tools that we will use in this method.
Prerequisites
- Make sure bootloader is unlocked of Galaxy A50s (Follow this guide)
- Take a full backup of your phone
- Charge your phone to at least 50%
- We are not responsible if you brick or damage your phone
Downloads
- Odin Tool
- Magisk Manager
- Samsung USB Drivers
- Stock Firmware for your phone
Create Magisk Patched Boot Image
- Install Magisk Manager App on your phone and upgrade it to the latest version.
- Download the firmware and extract it using any extractor.
- From the extracted folder, copy the AP file to phone storage.
- Now open the Magisk Manager App and click on Install > Install (in Magisk section).

- In select method, choose ‘Select and Patch a File’. Now browse and locate the AP file.

- It will now patch the AP file and the output will be saved in Download folder with name magisk_patched.tar.


Guide to Flash Magisk & Root Galaxy A50s
- Copy the magisk_patched.tar file to your computer.
- Now double click on Odin.exe to run the Odin tool.
- Power off your Galaxy A50s. Then press & hold Volume Up + Power button together and when Samsung logo appears, release the Power button. Keep pressing the Volume up button until you see the stock recovery.
- Now reboot to Bootloader/Download, navigate using the Volume buttons and to select press the power button.
- Once you are in Download Mode connect your phone to the computer using a USB cable.
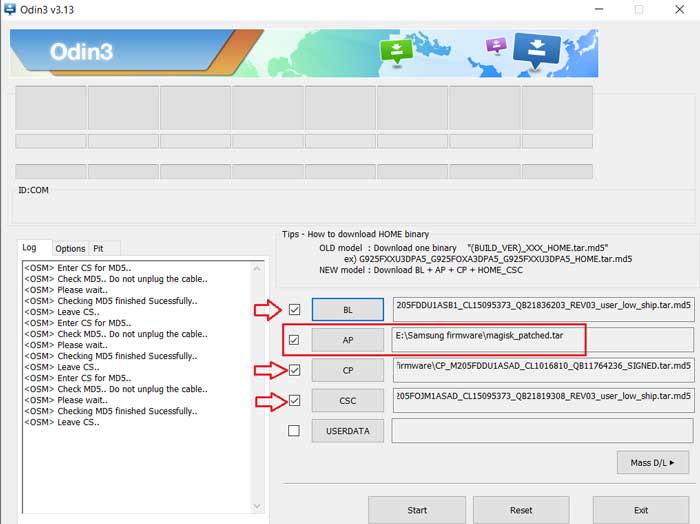
- In Odin go to the options tab and uncheck the ‘Auto-Reboot’. Now click on AP and select the magisk_patched.tar file. Then click on BL and load the BL file from the extracted firmware folder. Similarly, load the CP & Home_CSC file.

- Once all the four files are loaded click on the Start button. The flashing will start, and it can take some time to install.

- After installing, you need to perform a full Wipe. Press & hold Volume Down + Power button together and as soon as the screen goes off, immediately press and now hold Volume Up + Power button and release the Power button when you see Samsung logo.
- Keep pressing the Volume Up button while erasing and when the screen goes off immediately press & hold Volume Up + Power button together. Again release the Power button when Samsung logo appears but keep pressing Volume Up button.
- When the device boot into stock recovery, release the Volume Up button. Wipe all the data by choosing Wipe Data/Factory Reset.
- After the complete wipe, select Reboot Now and then immediately press Volume Up + Power button. Release both buttons when bootloader screen appears.
- It will now boot into the system, now set up your device and open the Magisk Manager (install it if it is not in the App list).
- Follow the steps that Magisk Manager ask you to complete then it will automatically reboot your phone.
- Done now your Galaxy A50s is rooted successfully.

So there you have it the complete guide on how to root Galaxy A50s. Now you can remove bloatware, install Apps that require root access, take backup using Titanium Backup. And if you get any error while rooting your phone let us know in the comment section.
Also Check: